
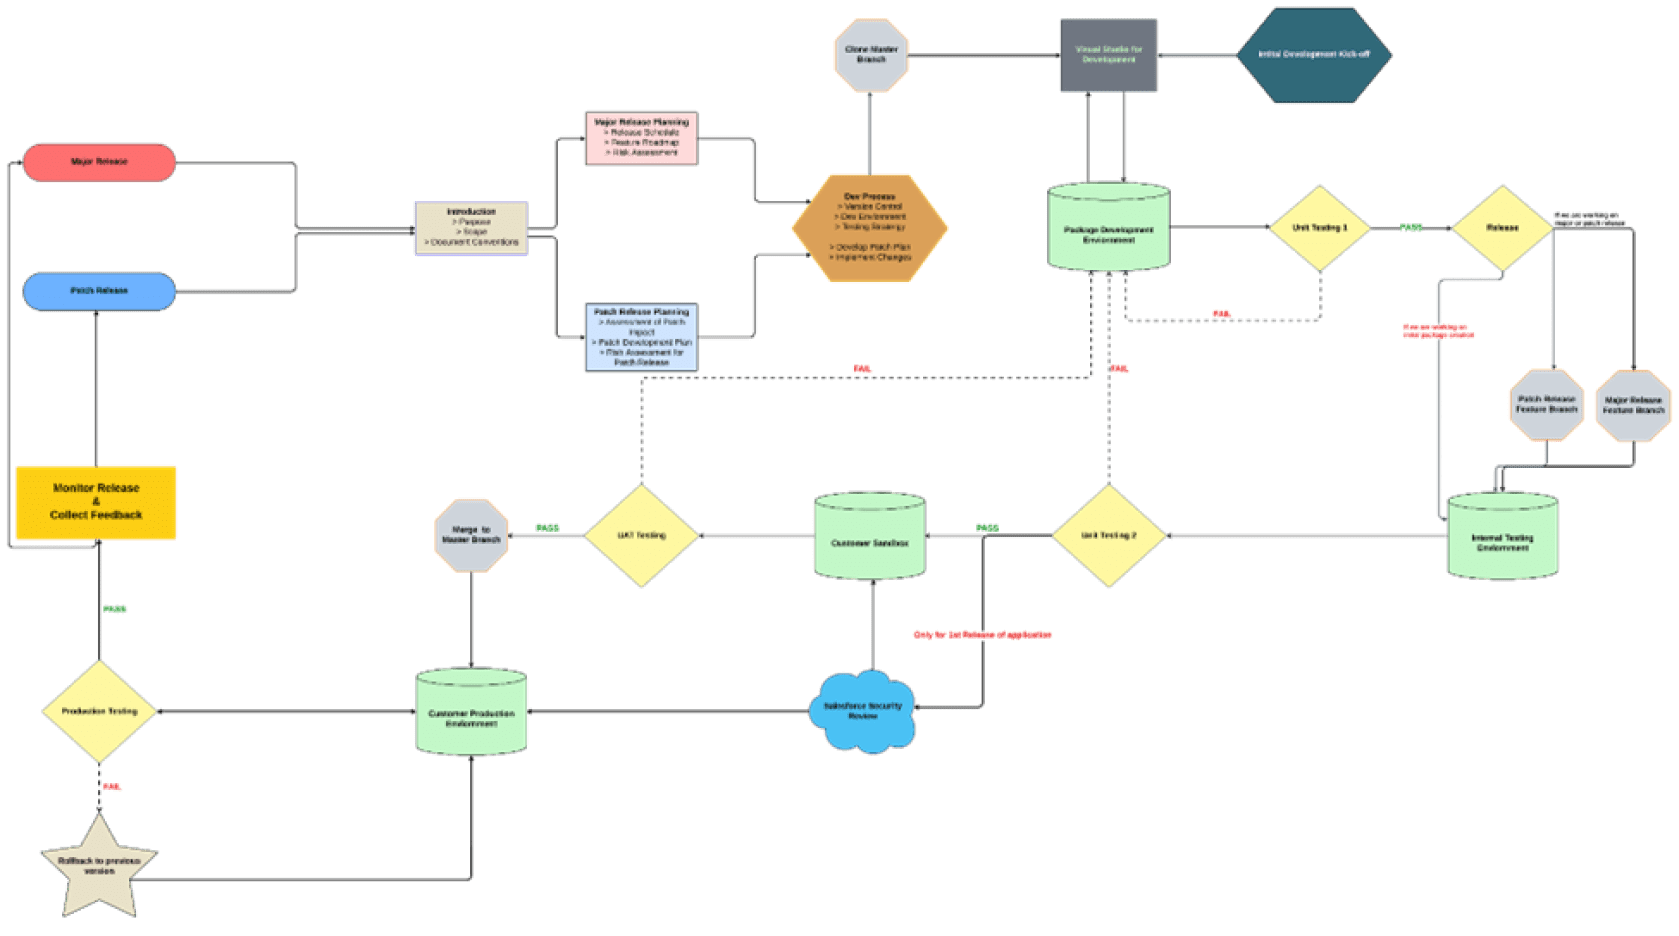
Salesforce offers two ways application updates can be distributed:
Major Release
A major release denotes a Managed – Released Managed-released package. During these releases, the major and minor numbers of a package version increase to a chosen value.
Patch Release
A patch release is only for patch versions of a package. Patch releases focus on fixing minor issues and during these releases, the patch number of a package version increments.
When to choose what?
Major release package:
Pros
- Add a new apex class.
- Add a new Lightning component or LWC.
- Add a new object or a field.
- Add a new static resource.
- Add a new permission set.
Cons:
- Only admins can manually install the major release update.
- Major releases cannot be pushed to existing deployments, registered ISV partners can request push major upgrades by logging a case in Salesforce but it’s always a high risk.
- Admin requires to uninstall and re-install the application for major updates which can lead to data loss and also other issues.
Patch release package
Pros:
- Can automatically be pushed to a customer’s organization.
- Reduces the number of releases.
- Adding a new method to apex controllers.
- Extend the functionality of Lightning components or LWC.
- Add files to existing static resources.
- Modify a permission set.
Cons:
- Modify the accessor of the class (change from public to global).
- Cannot add a new apex class.
- Cannot add a new Lightning component or LWC.
- Cannot add a new object or a field.
- Cannot add a new static resource.
- Cannot add a new permission set.
High-level strategy flow:
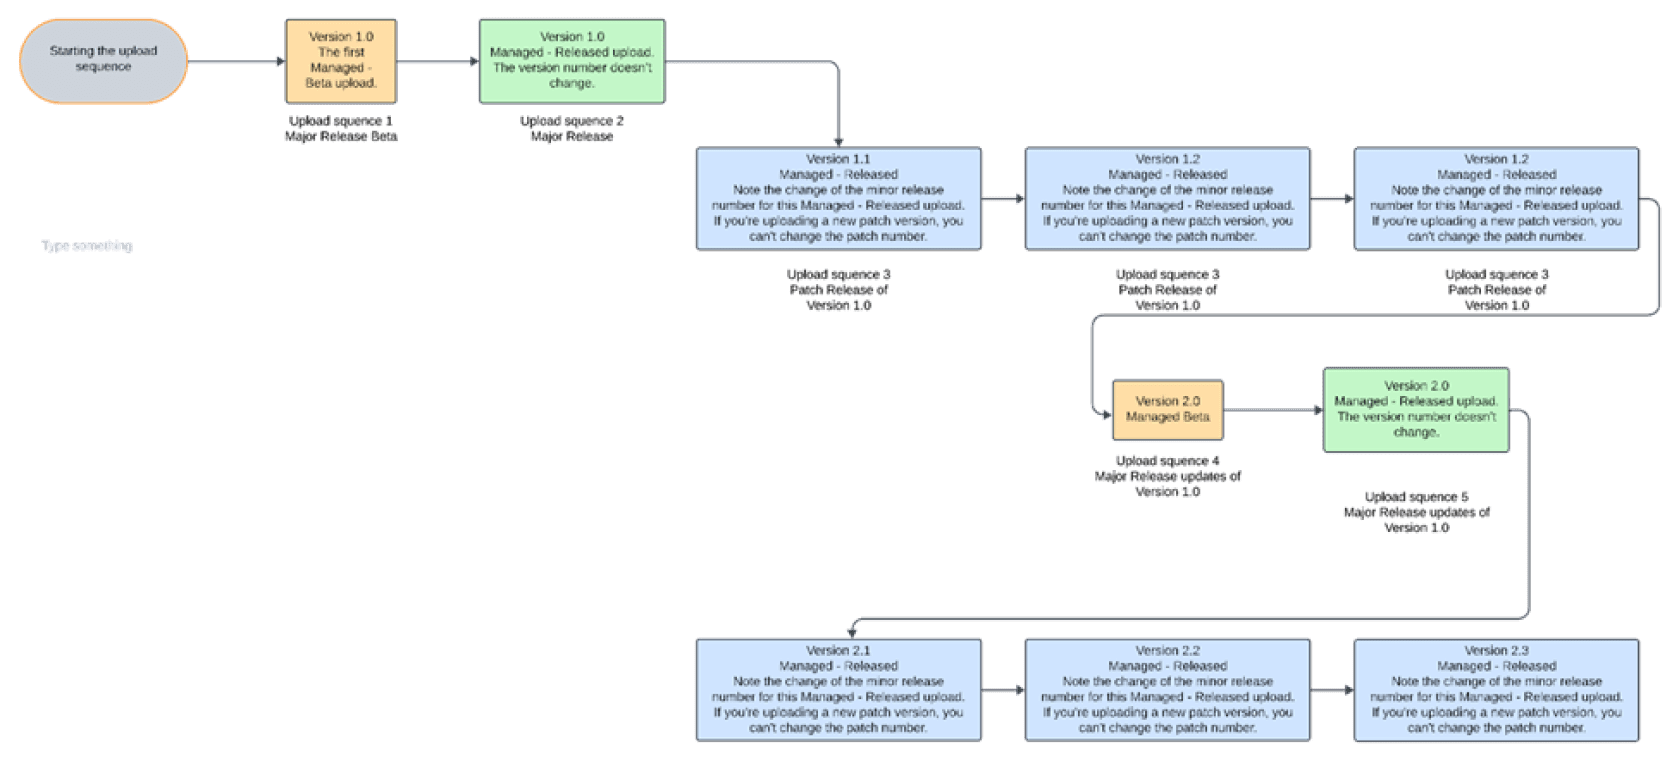
First-generation managed packages strategy flow:
The following chart shows a sequence of version numbers for a series of uploads
High-level strategy flow:
High-level strategy flow:
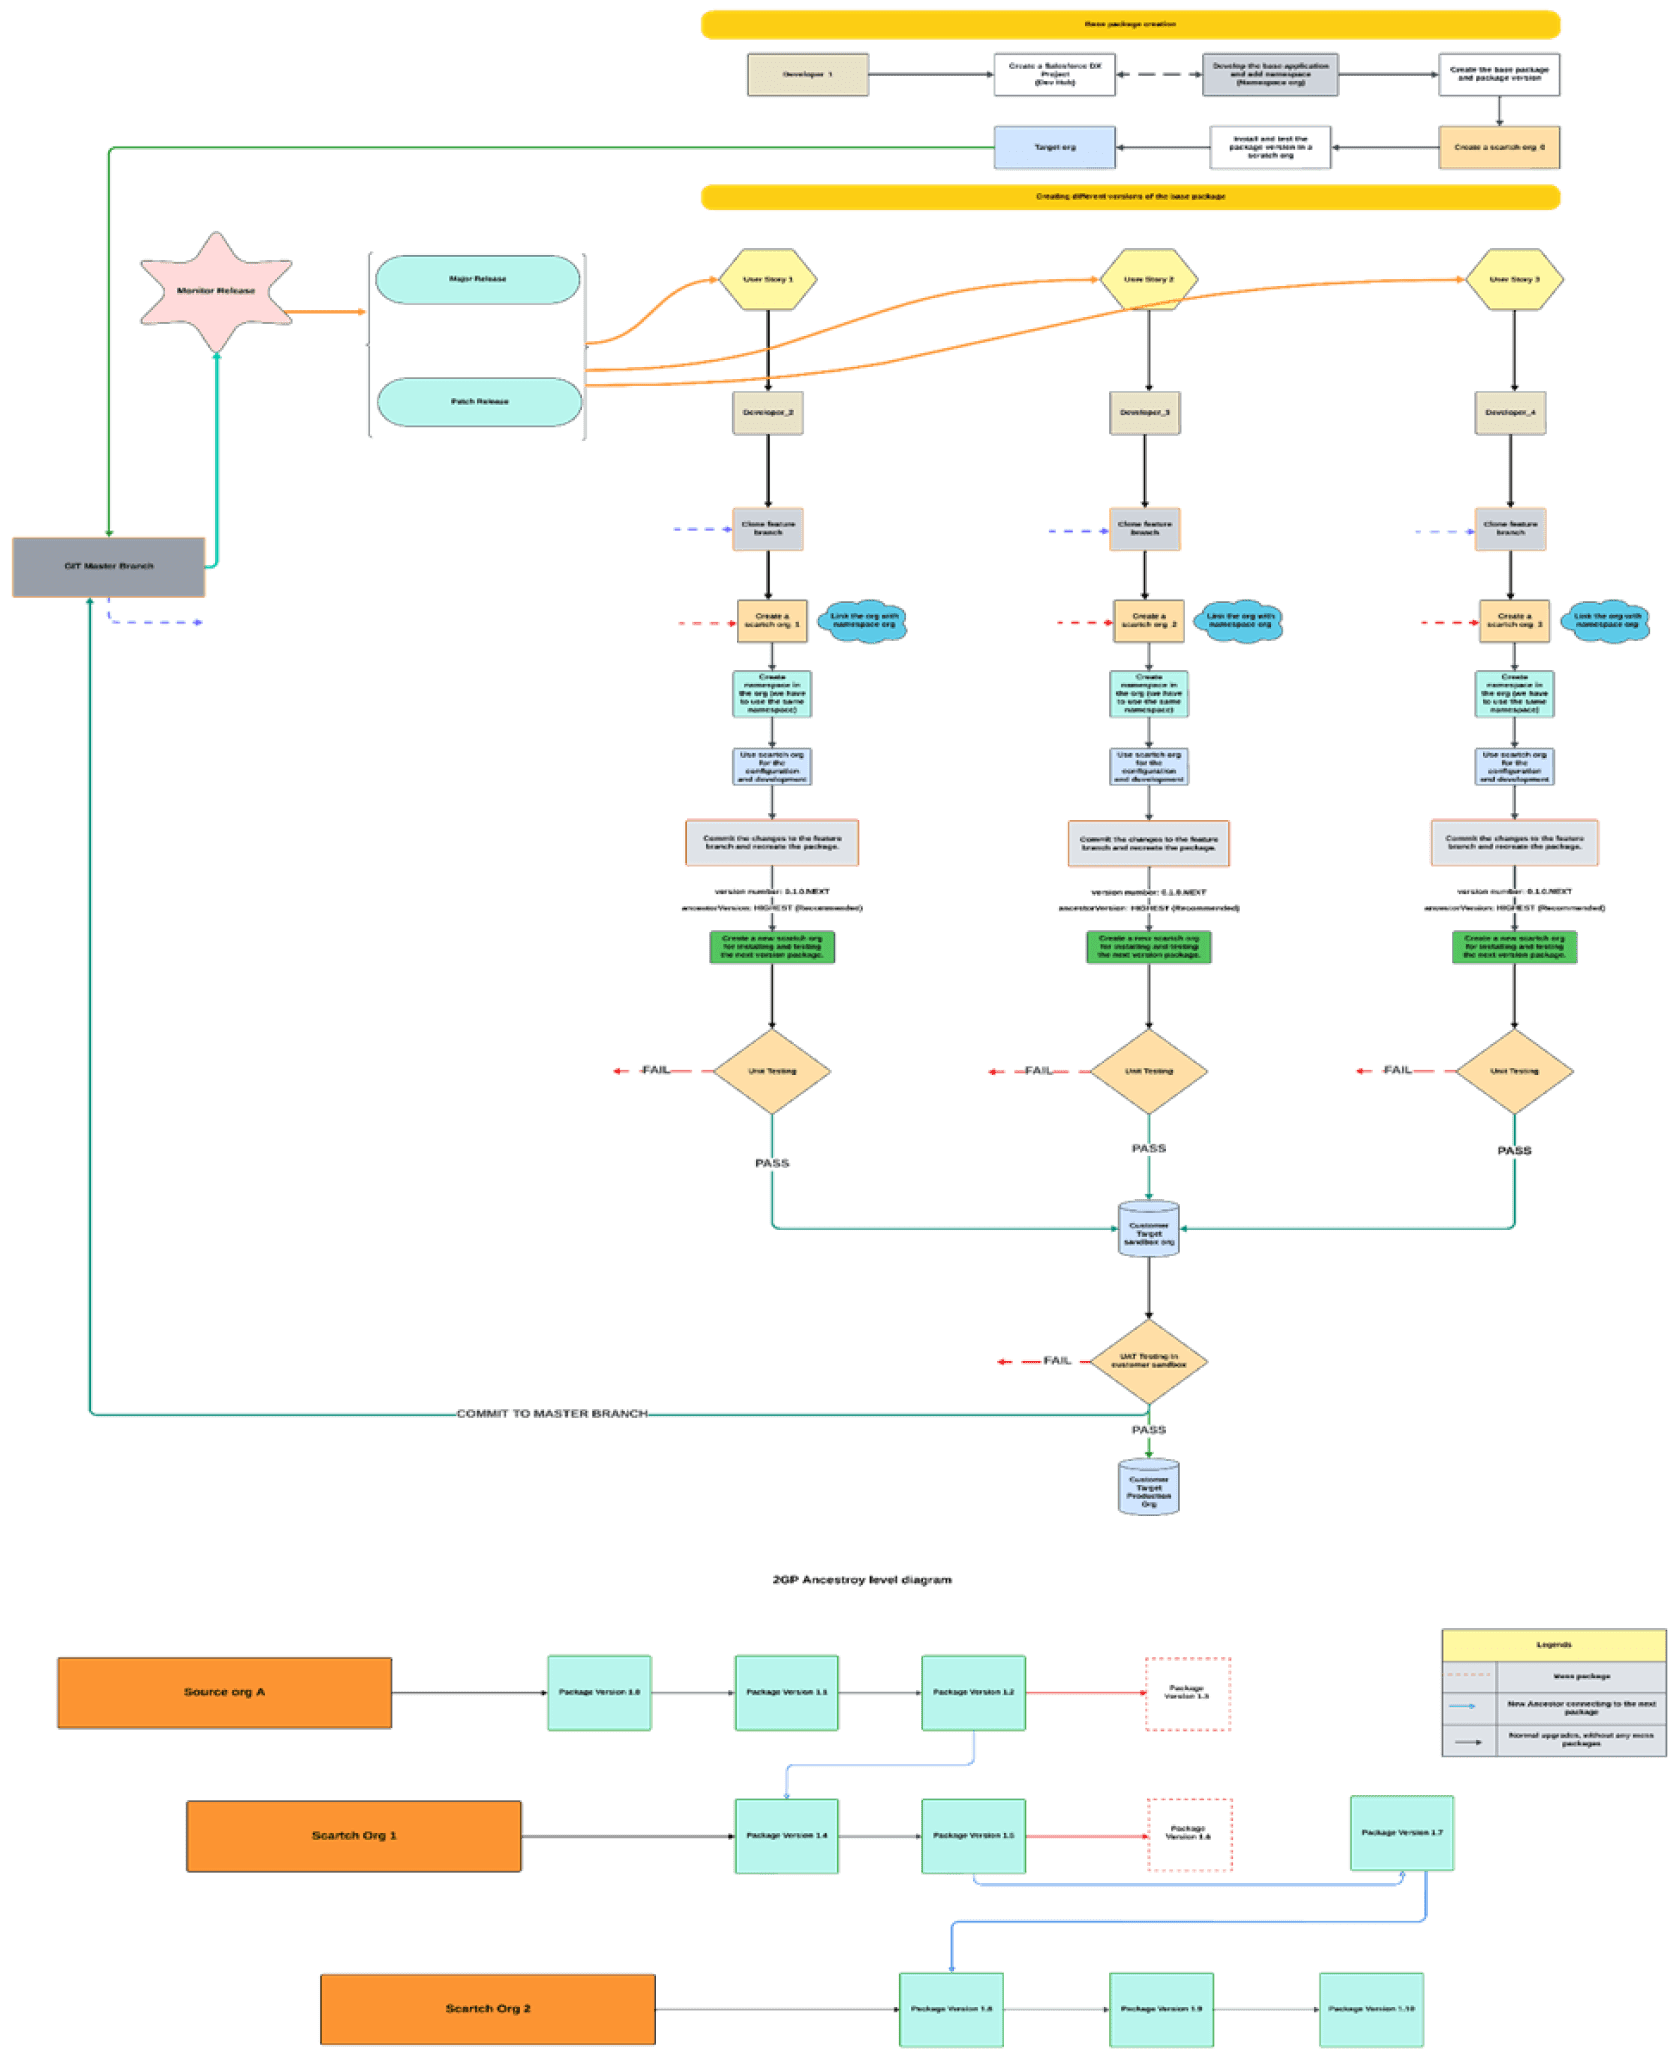
Create a Second-Generation Managed Package:
Setup Steps:
1. Create Dev Hub:
→ Sign up for Developer Org
→ Enable Dev Hub
→ Enable my Domain.
2. Create/Link Namespace
To use a namespace with a scratch org, you must link the Developer Edition org where the namespace is registered to a Dev Hub org.
Complete these tasks before you link a namespace:
→If you don’t have an org with a registered namespace, create a Developer Edition org that is separate from the Dev Hub or scratch orgs.
→If you already have an org with a registered namespace, you’re good to go. In the Developer Edition org, create and register the namespace.

Log in to your Dev Hub org as the System Administrator or as a user with the Salesforce DX Namespace Registry permissions.
→From the App Launcher menu, select Namespace Registries.
→Click Link Namespace.
→In the window that pops up, log in to the Developer Edition org where your namespace is registered using the org’s System Administrator’s creds.
→You can’t link orgs without a namespace: sandboxes, scratch orgs, patch orgs, and branch orgs require a namespace to be linked to the Namespace Registry.
→To view all the namespaces linked to the Namespace Registry, select the All-Namespace Registries list view.
3. Create SFDX Project and Auth DevHub
Create a new directory on your local machine for the dev directory. We will be using CLI and I’ve surrounded text in {} is for you to replace and make sure you won’t include {} in the command.
Project creation command:-
sf project generate --name {yourprojectname} --template standard

Auth DevHub:-
sfdx force:auth:web:login --set-default-dev-hub--alias {youralias}
4. Create Scratch Org
Let’s work in a single scratch org for the rest of this exercise, so we have set it as the default org. Set the duration days I am setting as 2 and the max is 30 days.
sf org create scratch –-duration-days 2 –-set-default --alias {youralias} –name {yourorgname} –-edition Developer
5. Push code to Scratch Org
Grab the code from the directory, and drop it in your /force-app/main/default/classes directory.
Run the command:
sfdx force:source:push
6. Create the Package
The following command only needs to be performed once for each package. Once created we can create and release versions.
Customers install versions, even though we say that they install packages most of the time.
sf package create --name { yourpackagename } --package-type Managed --path force-app --target-dev-hub {yourdevhubname
7. Illustrative Example:
7.1 Create a Released packaged version and install 0.1
Here is the sfdx-project.json I’m using for 0.1, make sure your namespace is what you picked earlier in the namespace org:
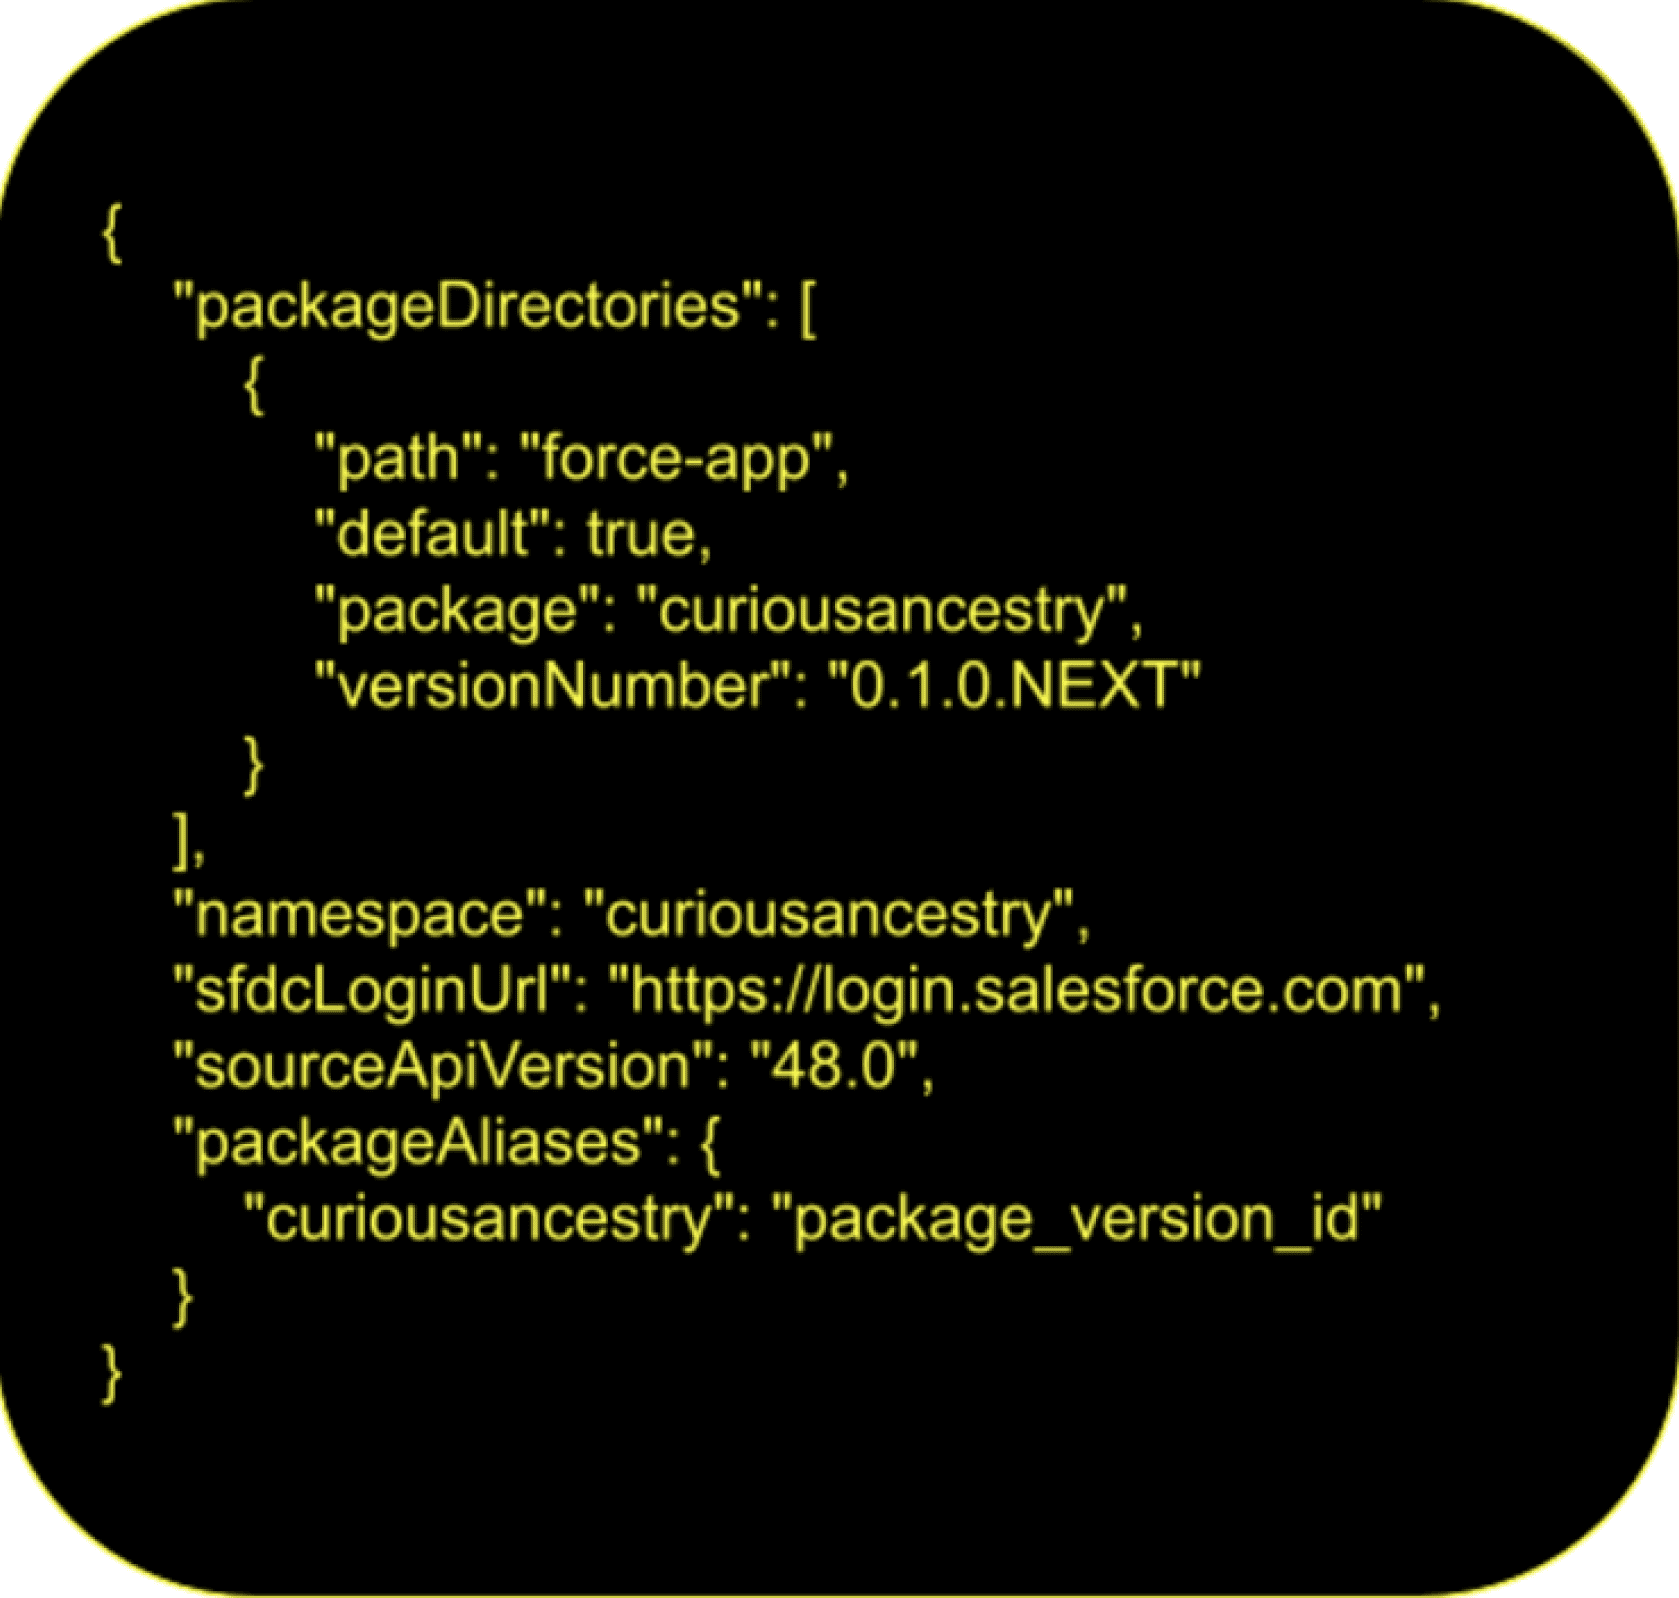
Replace the “package” with the actual package_name and the “package_version_id” with the real version id.
Below CLI is to create the package version:
sf package version create --path force-app –-code-coverage –-installation-key-bypass --wait 10 --target-dev-hub {yourdevhub}
Note :- While creating package version run code coverage is compulsory to promote the package but –-code-coverage flag is option while creating a package version.

Other Important flags: -

● --installation-key:- either --installation-key or --installation-key-bypass is required. If you bypass this requirement, anyone can install your package.
● --branch:- Name of the branch in your source control system that the package version is based on.
● --api-version:- Override the api version used for api requests made by this command
● --target-dev-hub:- (required) Username or alias of the Dev Hub org.
● --definition-file:- Path to a definition file similar to scratch org definition file that contains the list of features and org preferences that the metadata of the package version depends on.
● --skip-validation:- Skip validation during package version creation; you can’t promote unvalidated package versions.
When the above command is successfully run, you’ll see something like:

Before installing this, we want to release it. Remember, they always get created as Beta versions, and we’re not interested in betas today.
Run:
sfdx force:package:version:promote -p version_01_id -n
You can copy this version_01_id value to build a URL that can be used to install the package in your third Dev Org, using this format:
/packagingSetupUI/ipLanding.app?apvId=version_01_id
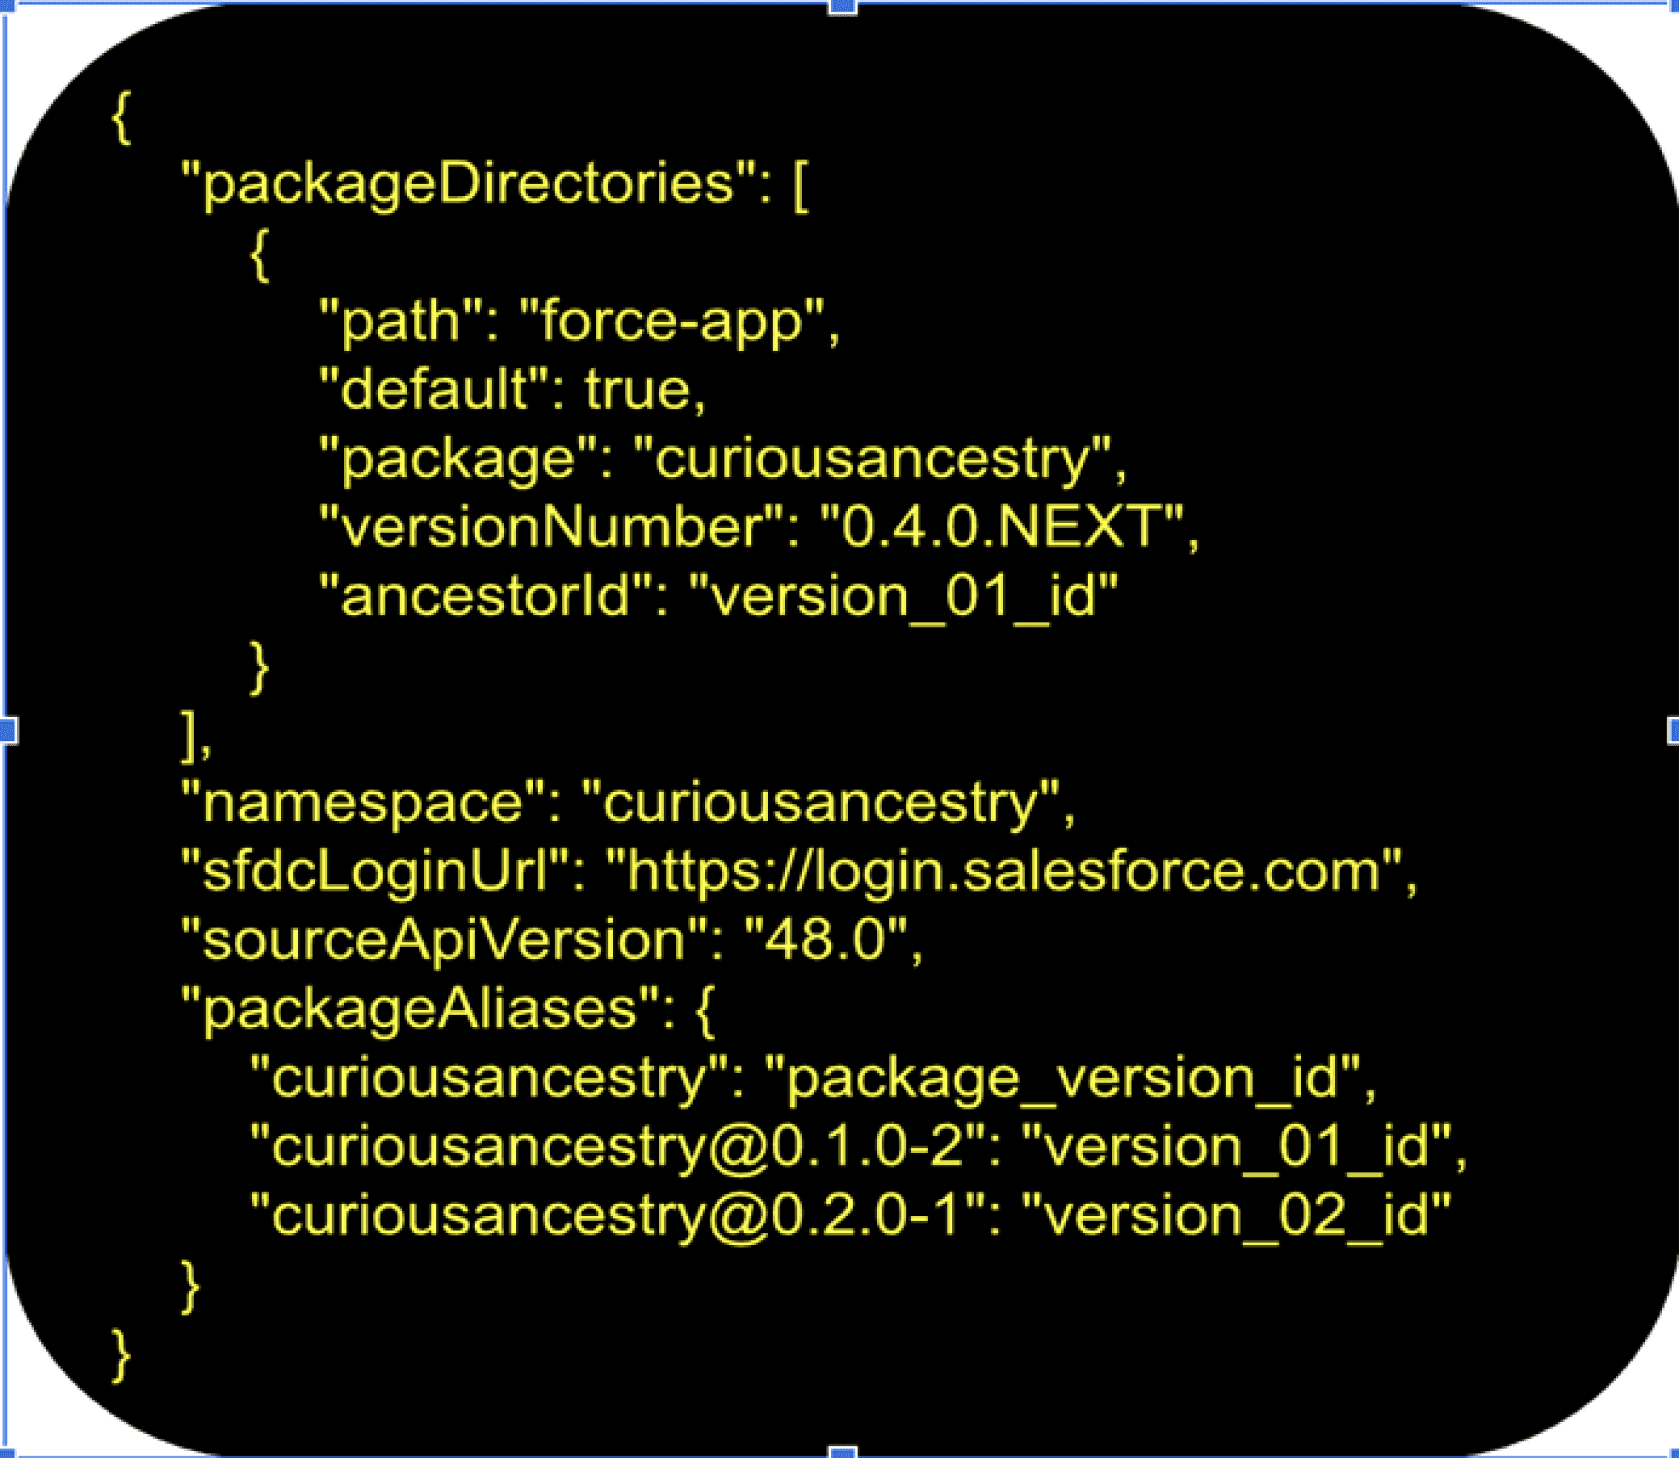
7.2 Upgrade package with ancestry
We are now going to break down the things and we will be releasing version 0.4, but keep the ancestor specified to the .1 ancestor id. This is what the sfdx-package.json should look like this:
To ensure your version number is unique, use the keyword NEXT when you set the version number in your sfdx-package.json file.
You can use ancestorId or ancestorVersion for example
“ancestorId”: “version_01_id”
“ancestorVersion”: “HIGHEST”
Run through the same commands you did during the installation for .1, short version here:
→Create Package Version
→Promote Package Version
→Install Package in Third Dev Org
You should see that the upgrade succeeded.
Salesforce Generic Release Management Best Practices:
Version Control:
Maintain a clear versioning strategy for your managed package. Follow standard versioning conventions to help subscribers understand the significance of each release.
Release Planning:
Create a comprehensive release plan that outlines the scope, objectives, timeline, and key milestones for each release. Consider feature enhancements, bug fixes, security updates, and compatibility with new Salesforce releases.
Testing and Quality Assurance:
Implement a robust testing process to validate the functionality and compatibility of your managed package with different Salesforce configurations and customizations. Perform unit testing, integration testing, and regression testing to identify and fix any issues before deployment.
Package Org Management:
Make sure we are using developer environments for creating and testing new packages.
Documentation and Release Notes:
Provide detailed documentation and release notes for each new version of your managed package. Communicate any new features, enhancements, bug fixes, known issues, and compatibility requirements to help subscribers understand the changes and their impact.
Rollback Plan:
Develop a well-defined rollback plan to revert to the previous version of the managed package in case of any critical issues or unforeseen problems during deployment. Ensure that you have backups of subscriber data and metadata to support the rollback process.
Post-Release Support:
Offer timely support to subscribers after the release to address any issues or concerns they may encounter. Provide resources, such as knowledge articles and support documentation, to help subscribers make the most of the new features and enhancements.
Useful link: Second-Generation Managed Packaging Developer Guide